
Links
Contact MeBuilding the "Comfy Hooves"
Whilst working on the hoof stilts, and studying other fursuit pictures, it did occur to me a way to make a plantigrade hoof with fake digitigrade. I made note of it, and put it aside, considering it the cowards way out, and a wimpy solution to the problem of digitigrade horse hooves for costuming.
Then, as years passed, and it sunk into me how insanely complicated successful digitigrade hooves are, and the realization that I had spent over two grand, and still had no finished fursuit, the idea of doing some quick fake hooves to get something finished moved more and more to the fore front.
Basic Concept
The essence of the idea is to create a hoof shell around the front of a shoe, use foam padding to create the foreleg, and to wrap the human leg in long fur feathering to hide its existence. Recently FURR HAPPENS (see their hoof here) created their own hoof, which seems to be done along my idea of a shell wrapped around a shoe, but without the lower horse leg, or hock padding.
More proof that the concept, at least, was doable.
Mk1 Hoof Shell
The first step, obviously, is to create a master and mold for the hoof shell. At first, I attempted to modify the mold I used for the Beta3 Hoof Stilts, but it was too small, and too narrow. So, it would have to be done from scratch.
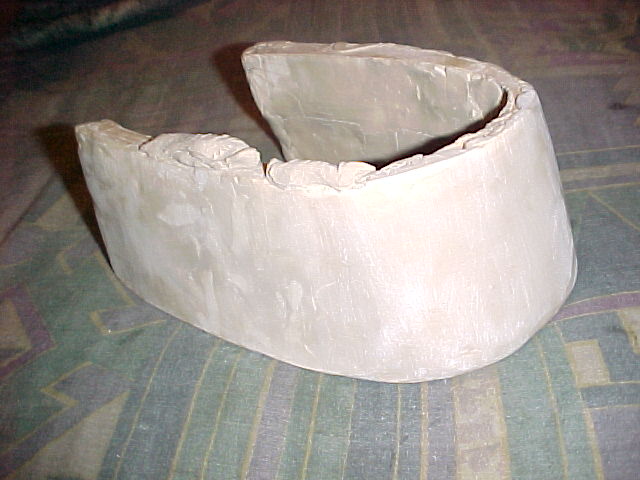
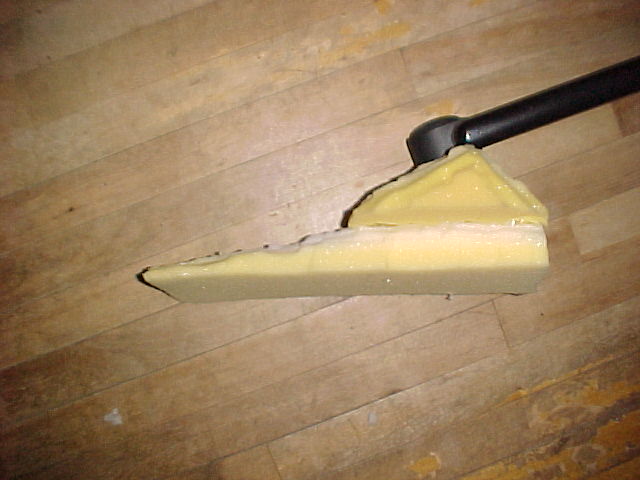
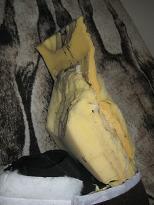
Two 2" thick pieces of lumber were glued together, and then a band saw was used to cut a roughly hoof shaped shell. It was intentionally cut longer (front-back) than a hoof would normally be to help create the illusion. This yielded a shell template 4" high, 6" wide and 8" long (roughly). The shell was coated with clay on both sides in three layers -- first to get the rough shape (i.e. the angle top-bottom at the front), the second to smooth down the surface and make it ready for sanding, and the third consisting of patches to even it out. The shell was sanded with course sand paper vertically so that the lines left would correspond to natural growth marks in a horse's hoof. The top was left unsmoothed -- some spaces were added so that the top would sit level. The bottom was smoothed as that would represent some of the actual bottom of a hoof.
A mold box was made from a child's plastic building blocks (reusable and adaptable) and the rubber was poured. Note that to save rubber (and give some flexibility in the shape of the cast project) the mold was set up as a u-shape around the u-shape of the master. This would allow the mold to be moved inward or outward somewhat to narrow or thicken the inside width of the hoof shell.
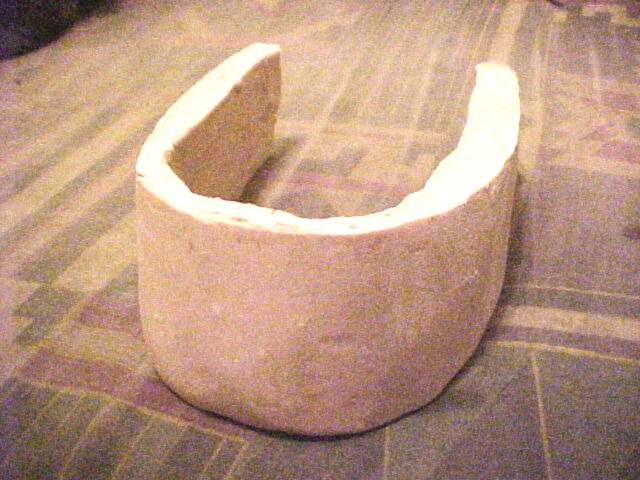
The hoof shell weighs about a pound, for those who are interested in that kind of thing.
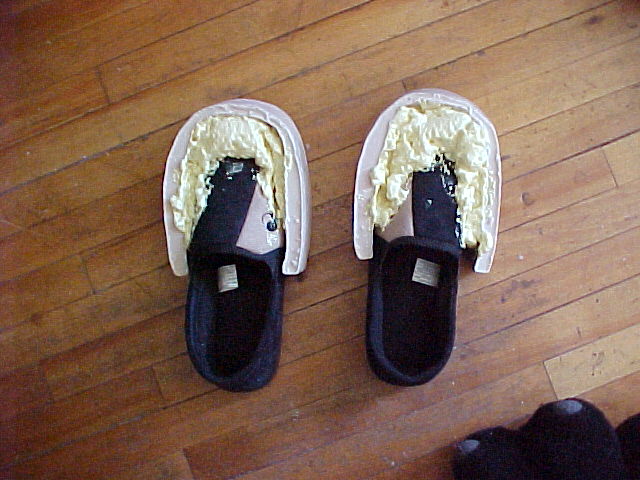
Mk1 Hoof on Shoe
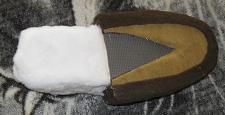
The next step, obviously, is to attach the hoof shell to the footwear. In this case, I acquired super-cheap slippers from a local discount superstore (Honest Ed's). After some research, I decided to try using an epoxy gap filler (DOW Great Stuff (tm) ). This stuff would expand to fill the gap, would epoxy it onto the shoe, and would provide some flexibility.
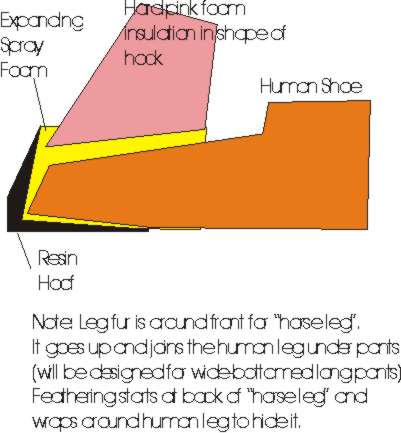
Mk1 Digitigrade Padding Plan
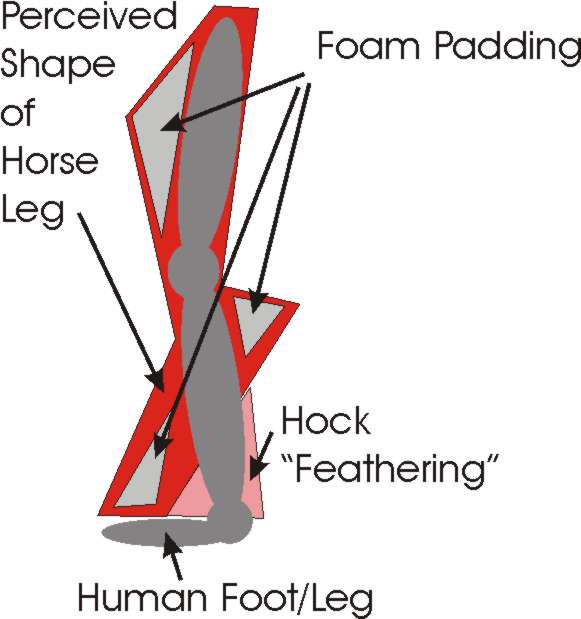
As you can see from the above diagram, there are three pieces of padding. One from the front of the hoof forming the hock of the horse leg, one behind the lower human leg, and one in front of the upper human leg. The human ankle/lower leg is disguised by the feathering. In essence, a longer fur is wrapped around the human leg, hopefully looking like dense feathering (the hairs growing from the hock of the horse leg, just above the hoof.
At least that was the plan...
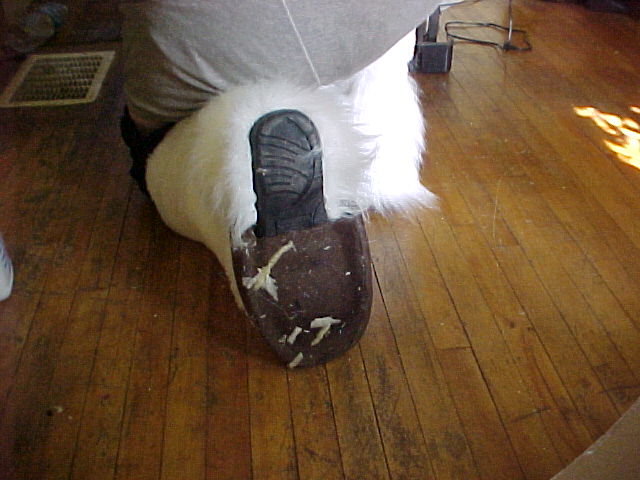
Mk1 Digitigrade Padding Execution (and Furring)
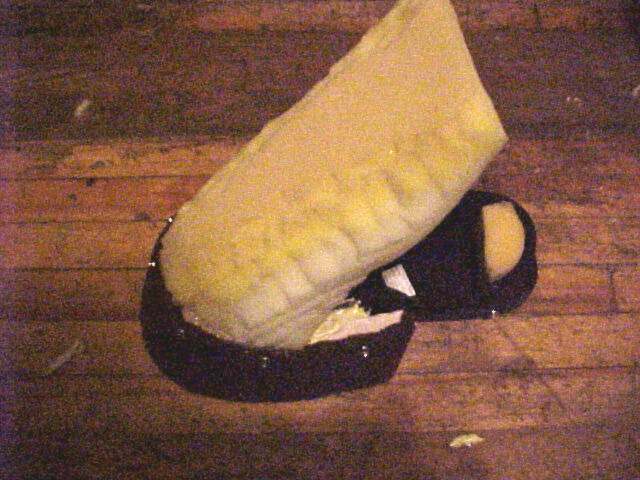
This shows the hock padding glued to the front of the hoof shell, going backwards towards the human foot. Some padding was added inside the heel of the slipper as they were suddenly too small -- I think the curvature of the hoof shell fit into the narrow part of my human foot and pushed my foot slightly forward. The hoof shell was covered with brown fleece to match the existing hoof hands, and metal push buttons were glued to hold the fleece whilst working out the base pattern.
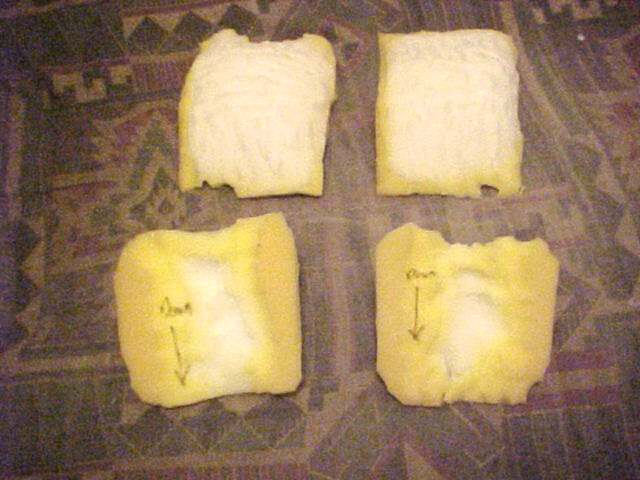
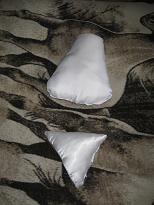
This shows the lower and upper leg padding. The bottom of the picture is the padding that goes behind the lower human leg; the top is the padding that goes on front of the upper human leg.
The covering was worked out from cheap white fleece pinned and clipped and sewn and tested, slowly working my way up the leg. The feathering was represented by a piece of brown fleece to differentiate. Sadly, due to the matching colour with the hoof covering, it didn't work very well. But, I was able to get an approximate shape, rip the seams apart, and make a pattern for the two pieces on cardboard.
The pattern was then used to cut out short white fur for the lower leg (the stocking of the horse), long white fur for the feathering, and short black fur for the actual horse hide colour further up the leg.
Theoretically, the test fitting with the fleece, and then the pattern, should have resulted in an easy job.
It didn't.
The problem was that the fleece was fairly stiff -- it didn't fold like the fur. Thus, I assumed that the fur would hide most of the folds that were in the fleece, and didn't worry about the problem.
Idiot!
Too many wrinkles, fur covering was way too big, and the testing and refitting and repadding and retesting and rerefitting and rerepadding (etc.) began.
Mk1a Digitigrade Padding Execution (and Furring)
What was the problem?
Well, it was two-fold. First, the folds. Secondly, was the fact that I was fitting it on myself by myself. And, I had done it sitting down. This distorted the entire appearance.
The greatest nightmare, by far, was the fact that fur is inflexible, and the leg had to bend so that I could walk, kneel, etc. Digitigrade padding with paws has it easy. The paw toes stick out forward, in a plantigrade pattern, so that the fur on the front of the leg bends at the human ankle -- very little change in length. There is no padding on the front of the human foot, there's no need for it.
What this meant was that I had to get stretchability out of unstretchable fur. Or, find some way to hide the wrinkles as best I could when bending, walking stretching my foot, etc. The answer I ultimately came up with was to let the foam padding do the work. As long as the surface of the fur was the same length, there would be no wrinkles. The foam would compress against my foot, or expand outward, pressing against the fur and keeping it taut. I hoped.
And, of course, my paranoia to err on the large size in making the covering didn't help, but it did give me room to maneuver.
I ended up adding a large amount of padding. A longer thin piece to the front of the existing hock -- largely to get rid of the annoying flat front from the original piece. A large block behind the top of the original hock piece to hold it away from my foot and help shape it properly. A much thicker and longer piece along the back of my lower leg to help deal with wrinkles, and to give some flexibility so that when the leg bent, the foam would expand/contract and hide most of the wrinkles.
This picture shows the additional padding to the hock of the hoof. The long thin piece on top was added mostly to hide the flat front of the original piece. It was lengthen to provide a bit of coverage in the gap between the original piece and my leg, something I thought the fur would cover naturally. The block at the back top of the front piece was added as a spacer to keep it away form my leg. The two side pieces were added because the leg has to, at least initially, have the same width of the hoof, not my foot. In hindsight they may not be necessary, but they are still there.
This shows the expanded padding for the back of my lower leg. (The black thing is one leg of my desk chair holding the piece on its side for photography) The shape of the corner is the same, but it is pushed out more, and there is padding for the entire length. The primary purpose of this was to give some expansion/compression to allow wrinkle-free movement.
The changes to the fur covering consisted of removing 0" to 3" from the hock padding from feathering edge to feathering edge, and pulling in the fur on the top side of the back padding by almost 6" in leg circumference. This had to be done to emphasize the sharp corner and to emphasize the shape of the leg.
And yes, there was lots of test fitting, pinning, etc. to get this right.
At least it is not a very exact sizing -- a close approximation was enough. Once I got the first one done, it took only a few hours to do the second.
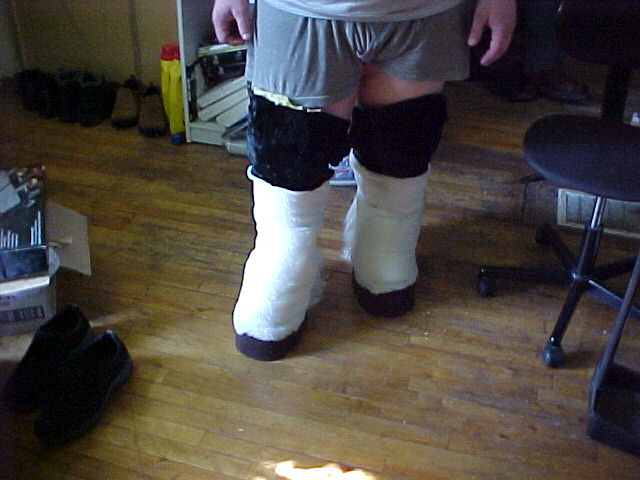
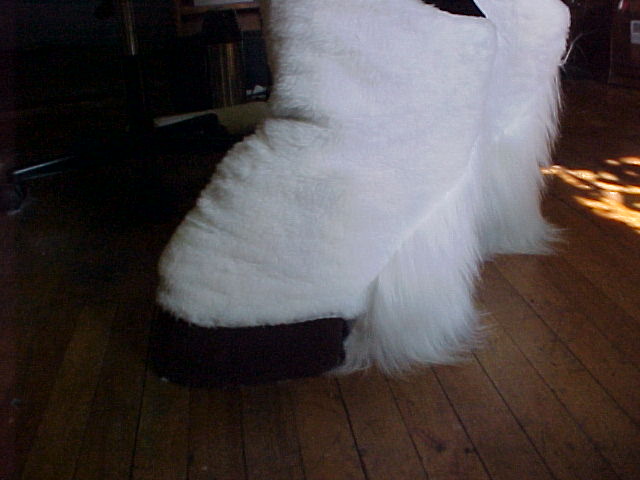
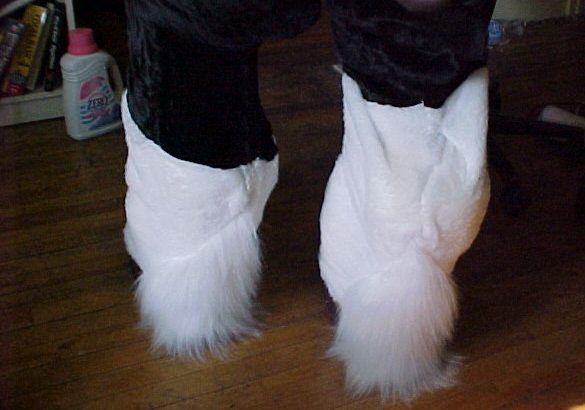
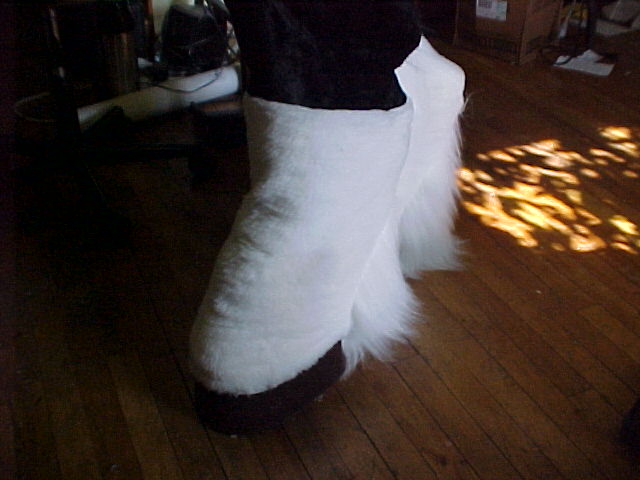
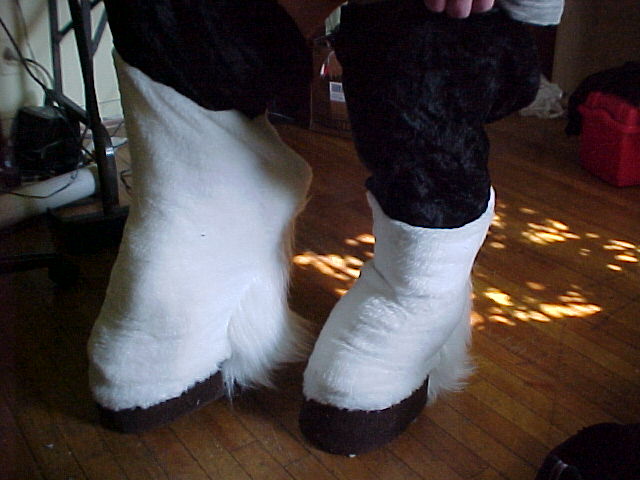
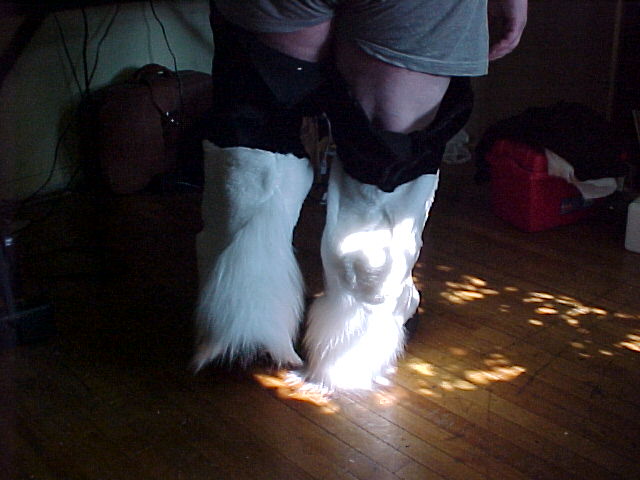
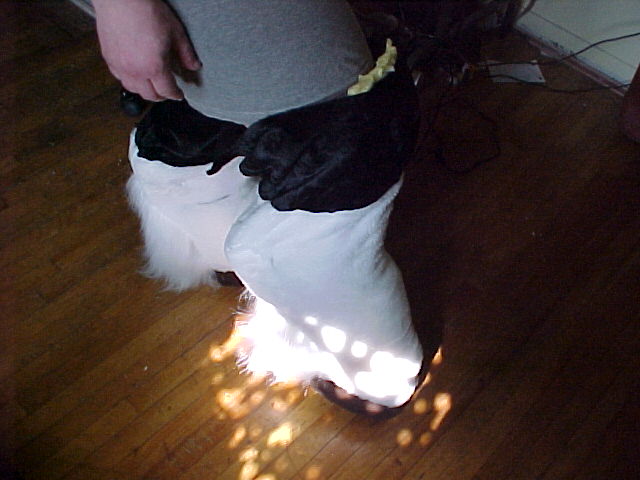
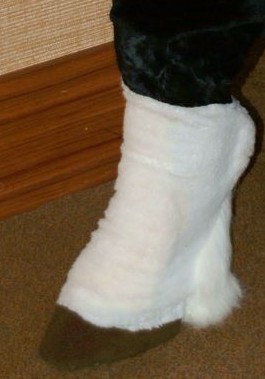
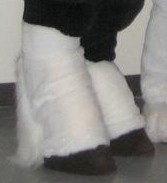
Mk1a Finished Product
Well, almost. The top isn't quite done as I need to get the body suit done so that I can get the lengths right. But, the rest is. So, here are pictures to give you an idea of how they look. Enjoy!
Note: You can see my hands often holding up the fur covering at the top. Ultimately there will be either metal clips or elastics going to a waste belt, or something similar, to do the job for me.
Mk1b Comfy Hoof
After showing the initial model on the Fursuit LJ Group, it was pointed out to me that the front angle of the hoof is way too steep. Also, that the horizontal angle of the hoof was too shallow. After some soul searching, I figured out a fairly easy way to fix it. In essence, sculpt the proper front of the hoof shell onto a cast blank, make a new mold out of the old mold, casting the additional front piece only, and then gluing said front piece onto the front of the hooves. To steepen the horizontal angle, I would simply hot glue a triangular piece of white fur to each side. Not perfect, but doable.
I managed to get the fleece off of the front of the hooves, epoxy on the addition, reinforce it with wooden pegs that went through into the original hoof shell, and with hot glue around the sides. Then another covering of fleece was done over the whole hoof. The extra white fur was just hotglued to the sides.
I also fiddled a bit with the fur covering to make the digitgrade shape sharper. Also, the pads on either side of the hoof shell were removed as they had proven unnecessary.
Mk1c Comfy Hoof
 Wearing
the comfy hooves for a day to go to a furry BBQ revealed a fairly critical
problem. The foam epoxy joining the slipper to the hoof shell simply
wasn't strong enough. By the end of an eight hour period, the slippers had
come loose. It didn't fall apart, but the hoof shell bounced around
independent of the slipper and something was going to break.
Wearing
the comfy hooves for a day to go to a furry BBQ revealed a fairly critical
problem. The foam epoxy joining the slipper to the hoof shell simply
wasn't strong enough. By the end of an eight hour period, the slippers had
come loose. It didn't fall apart, but the hoof shell bounced around
independent of the slipper and something was going to break.
Using five minute epoxy did not resolve the problem.
The Mk1c was the Mk1b but with a quarter inch metal bar run through the sole of the slipper and into the hoof shell on either side. This solved the strength problem, but given the cheap slippers, it made the inside space really teeny so that my toes were painfully pinched, and within an hour went numb. This was fixed by using a sharp knife to hack up the top of the slipper above the bolt, adding a thick insole, and putting a inch of foam between the sole and slipper top. This yielded the successful Mk1c model.
At one point at Anthrocon 2008 I wore them from 8am to 10pm, said timespan which included walking all over the con site (frighteningly huge), marching in the Death March (aka Fursuit Parade), attending a Hoofers panel, and doing lots of things.
Success!
Mk1 Observations/Conclusions
But not perfection.
After the 14 hours, I could barely move. Not because of blisters, or numbness, or any such thing, but because my feet were incredibly sore from walking all day on a very thin sole -- no real padding. The Mk1 was about as comfortable as it was going to get using cheap slippers as the base.
There were also certain problems with the foam padding. Specifically that between the front of my lower leg and the padding at the front of the hoof leg. In other words, where there was none. It worked, it looked fine, but the leg fur slightly sagged over a longer period, leaving annoying large wrinkles and ruining the proper shape I was aiming for.
Also, I was never happy with the look of the upper portions of the fursuit padding. To be particular, the font of my thigh. Examining some of the fursuits at Anthrocon showed that I had simply gone too small on the top pad. It needs to be bigger.
Mk2 Comfy Hoof
The base of the Mk2 was a proper pair of pull-on shoes with a significant sole. The hoof shell was cast with the improved front as part of the form, and with a far steeper horizontal angle towards the back. Higher quality white fur was used. Padding was set up so that it rested against the front of my lower leg in an attempt to resolve the slump problem. And, the thigh padding was made significantly larger.
 For
a more unified bottom, and to hide the shoe it was built around, a piece of
floor foam was shaped and glued to the bottom with
IBM 3M 90 spray adhesive. The front was angled to blend in with the
angle of the hoof.
For
a more unified bottom, and to hide the shoe it was built around, a piece of
floor foam was shaped and glued to the bottom with
IBM 3M 90 spray adhesive. The front was angled to blend in with the
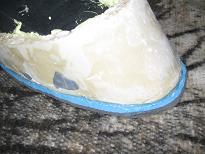
angle of the hoof.The gray blob is epoxy putty used to seal the hole (one at either side) of the brass rod that ran through the sole of the shoe. It was not as necessary as the shoe and hoof shell were glued to the foam, and had the same filling as the Mk1, but since it is going to be footwear extra strength can't hurt.
You can also see the downward angle, front to back, of the revised hoof shell.
 To
make the bottom of the hoof look like a hoof, and not shoe or rubber or
foam, various components were glued overtop of the black floor foam. Note
that the foam runs the whole length of the hoof, including the heal of the shoe.
The light brown represents some of the fleshy part of the hoof, the dark brown
represents the hoof itself. A "U" of brown fleece was hot-glued to the
bottom, both to cover up the folded over bottom of the brown around the hoof (it
wasn't u-shaped as there would be gaps or folds if it was part of the main
piece) and to give additional strength. The triangle of black foam left
visible is both to make the bottom look realistic, and to be pushed down
against the floor to provide traction. Short white fur was hot-glued over
the back half of the shoe to blend into the white feathering (if the hoof would
have black feathering, for example, then short black fur would be put over the
back half of the shoe).
To
make the bottom of the hoof look like a hoof, and not shoe or rubber or
foam, various components were glued overtop of the black floor foam. Note
that the foam runs the whole length of the hoof, including the heal of the shoe.
The light brown represents some of the fleshy part of the hoof, the dark brown
represents the hoof itself. A "U" of brown fleece was hot-glued to the
bottom, both to cover up the folded over bottom of the brown around the hoof (it
wasn't u-shaped as there would be gaps or folds if it was part of the main
piece) and to give additional strength. The triangle of black foam left
visible is both to make the bottom look realistic, and to be pushed down
against the floor to provide traction. Short white fur was hot-glued over
the back half of the shoe to blend into the white feathering (if the hoof would
have black feathering, for example, then short black fur would be put over the
back half of the shoe).
Close up it's obvious what is what, but when walking down a hallway, the momentary glance you see of it looks like an actual hoof.
 This
shows all of the leg padding, and the white velcro along the top of the hoof shell, and along the top of the short white fur. Note how thick the
padding is. It was not glued to the tongue of the shoe, but allowed some
freedom of movement to aid walking. The velcro is designed to hold on the
leg fur to ease putting the hooves on, to allow ease of transport (keeping the
hooves separate), ease of cleaning (take hooves off, wash leggings as normal),
and sharper appearance (as the entire hoof is effectively part of the leg, there
is no "bulge" where the leg fur overlaps the foot fur.
This
shows all of the leg padding, and the white velcro along the top of the hoof shell, and along the top of the short white fur. Note how thick the
padding is. It was not glued to the tongue of the shoe, but allowed some
freedom of movement to aid walking. The velcro is designed to hold on the
leg fur to ease putting the hooves on, to allow ease of transport (keeping the
hooves separate), ease of cleaning (take hooves off, wash leggings as normal),
and sharper appearance (as the entire hoof is effectively part of the leg, there
is no "bulge" where the leg fur overlaps the foot fur.
 Rather
than using foam glued to the fur as in the Mk1, I used the ideas in
Matrices Tutorial
to make the leg padding. In essence, you have two separate pads
(one for the back of the lower leg, one for the front of the upper leg)
that are inserted for wear, and removed for storage and cleaning.
They work quite well, though they do shift (lycra material is used on
one side to "cling" to the leg, and slippery white material on the other
so the fur can slide up and down) but they are a bit flaky for me.
I'm probably going to add a piece of velcro to hold them to the fur
during wearing, yet allow easy removal for costume assumption and
cleaning.
Rather
than using foam glued to the fur as in the Mk1, I used the ideas in
Matrices Tutorial
to make the leg padding. In essence, you have two separate pads
(one for the back of the lower leg, one for the front of the upper leg)
that are inserted for wear, and removed for storage and cleaning.
They work quite well, though they do shift (lycra material is used on
one side to "cling" to the leg, and slippery white material on the other
so the fur can slide up and down) but they are a bit flaky for me.
I'm probably going to add a piece of velcro to hold them to the fur
during wearing, yet allow easy removal for costume assumption and
cleaning.
Mk2 Observations/Conclusions
 The
final look. The fur wrinkles a bit, but that's because of the pads
shifting. Still, it is much less than the Mk1. You can see
that the apparent angle of the lower leg directly moves into the angle of the
front of the hoof for realism, and that the back of the hoof slopes downward,
again for realism. The feathering still wraps around the human leg, but
this just makes the fur look longer than the 3" fur actually used.
The
final look. The fur wrinkles a bit, but that's because of the pads
shifting. Still, it is much less than the Mk1. You can see
that the apparent angle of the lower leg directly moves into the angle of the
front of the hoof for realism, and that the back of the hoof slopes downward,
again for realism. The feathering still wraps around the human leg, but
this just makes the fur look longer than the 3" fur actually used.
Due to the shoe/hoof construction, there is almost an inch of padding between the foot and the floor (the shoes had about half an inch of padding below the human foot) so they are extremely comfortable -- almost a little bit too comfortable. When you first put them on, you almost bounce, which looks odd when walking. The other minor problem is that the sponge sole means there is no clomp sound. Since most cons have carpeting, and outside it doesn't matter, it's not a big thing. Still... There is a nice clomp sound if you knock the upper front of the hoof against a hard floor. To fix this, you'd have to glue a piece of wood inside the foam bottom somehow, so that it clomps on impact. Then you'd have to paint it, etc. I may do that if I ever replace this pair, but I have no plans to do so at this time.